
Physics can sometimes seem like a puzzle, but free-body diagrams are here to help piece that puzzle together. These diagrams give a visual snapshot of the forces acting on an object, making it easier to understand what’s going on. Understanding free-body diagrams is crucial for AP® Physics 1, as they help you visualize forces and solve problems more efficiently.
What We Review
What is a Free Body Diagram?
A free body diagram is a simplified representation that shows all the forces acting on a single object. It’s like taking a snapshot of the forces at play, which helps in analyzing the situation. By focusing on one object at a time, you can clearly see how different forces interact and affect it. This focused analysis is essential because it allows physicists and students alike to predict how an object will behave under certain conditions.
Understanding Forces
Forces are pushes or pulls that can cause an object to move, stop, or change direction. They’re vectors, which means they have both a magnitude (size) and a direction. Forces can be broadly classified into two categories:
- Contact forces: These occur when objects physically touch each other, like friction and tension.
- Non-contact forces: These act over a distance, such as gravity and magnetic forces.
Together these forces contribute to the net force—the overall force acting on an object after all the individual forces are combined.
Components of a Free Body Diagram
Creating a clear free-body diagram involves a few critical components:
- Object representation: The object is usually represented by a simple dot, which marks its center of mass.
- Direction of forces: Arrows show the direction in which each force is acting on the object.
- Magnitude of forces: The length of each arrow represents the force’s strength (longer arrows mean stronger forces).
Using a coordinate system helps organize the forces directionally, making analysis straightforward.
Creating a Free Body Diagram
Drawing a free-body diagram involves a systematic approach:
- Identify the object or system: Focus on one object and its interactions.
- Determine all forces acting on the object: Consider both contact and non-contact forces.
- Represent each force as a vector: Draw arrows for each force.
- Label the forces appropriately: Use symbols or names to identify each force.
Example: Drawing a Free Body Diagram for a Book Resting on a Table
- Identify the object: The book.
- Determine forces: Gravity acts downward, and the normal force from the table acts upward.
- Represent forces: Draw an arrow down for gravity and an arrow up for the normal force, both equal in length if the book is at rest.
- Label forces: Write “Fg” for gravity and “FN” for the normal force.
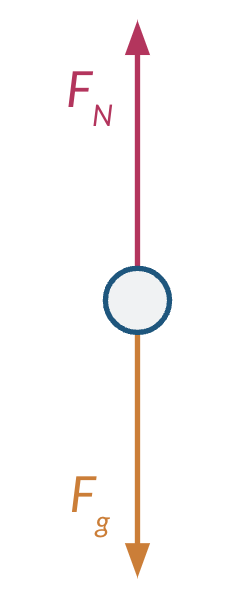
This object is in equilibrium because the forces acting on it are balanced. If we consider the gravity force to be in the negative direction and the normal force to be in the positive direction, then the sum of all the forces acting on the book are zero.
Example: Forces at an Angle
When drawing free-body diagrams with forces at an angle, there are a few important changes to be aware of. Start by choosing a coordinated system. For inclined planes, it’s often helpful to rotate the axes so that one axis is parallel to the surface and the other is perpendicular.
For example, a 5.0 kg box is placed on a 30° inclined plane. A 20 N force is applied up the incline, while kinetic friction acts opposite to the motion with a coefficient of 0.20. The box is not in equilibrium and moves along the plane. Draw a free-body diagram showing all forces acting on the box, including gravity, normal force, friction, and applied force.
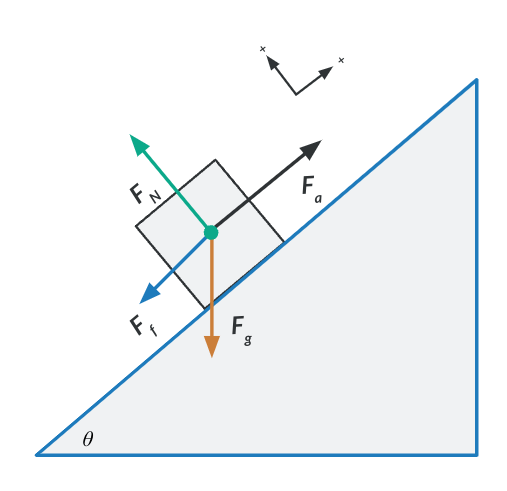
In this FBD:
- Gravity acts straight down toward the Earth.
- The normal force is perpendicular to the incline and supports the box.
- Friction opposes the box’s motion down the incline due to surface resistance.
- The applied force acts up the incline, working against both gravity and friction.
For simulations and practice that you can check along the way, try out this interactive from Physics Classroom.
Analyzing Free Body Diagrams
Once a free-body diagram is complete, it’s time to analyze it. This involves understanding how the forces affect the object’s motion. If the forces are balanced (net force is zero), the object remains at rest or moves at a constant velocity—this is static equilibrium. Otherwise, unbalanced forces lead to acceleration, and we can use equations of motion to quantify this.
Step 1: Identify Whether the Object is in Equilibrium
- If the net force is zero (\Sigma F=0):
- The object is in static equilibrium (if at rest) or dynamic equilibrium (if moving at constant velocity).
- This means all forces balance out, and there is no acceleration.
- Example: A book resting on a table or an elevator moving at a constant speed.
- If the net force is not zero (\Sigma F\neq 0):
- The object accelerates in the direction of the net force.
- This follows Newton’s Second Law, where\Sigma F = ma.
- Example: A box sliding down an incline with friction or a car accelerating forward.
Step 2: Break Down Forces into Components (If Needed)
For forces at an angle (like gravity on an incline or tension in a rope), resolve them into:
- Parallel component (aligned with motion)
- Perpendicular component (supports the object, often balanced by the normal force)
Use trigonometric functions:
- F_{\parallel} = F \sin \theta (along the surface)
- F_{\perp} = F \cos \theta (perpendicular to the surface)
This is especially useful in inclined plane problems, a common AP® Physics 1 exam topic.
Step 3: Apply Newton’s Second Law
Newton’s Second Law states: \sum F = ma
- If the object is accelerating, solve for net force in the direction of motion.
- If there’s friction, include kinetic or static friction forces in calculations:
- Kinetic friction: F_f = \mu_k F_n
- Static friction: F_s \leq \mu_s F_n
Step 4: Check Your Work
Before solving numerically, ask:
- Do the directions of forces make sense?
- Should the object be accelerating or at equilibrium?
- Are forces acting in opposite directions correctly accounted for in the equation?
Many AP® Physics 1 multiple-choice and free-response questions test conceptual understanding of force balance and acceleration. Always think critically about how forces combine before jumping into calculations.
Conclusion
Free body diagrams are a powerful tool in physics. They simplify and clarify the forces acting on an object, making predicting and calculating movement easier. Practice drawing and analyzing these diagrams to enhance understanding and problem-solving skills.
| Term | Definition |
| Free Body Diagram | A sketch showing all forces acting on a single object |
| Force | A push or pull acting on an object, defined by magnitude and direction |
| Vector | A quantity having both magnitude and direction |
| Net Force | The overall force acting on an object |
| Static Equilibrium | State where all forces are balanced, and there is no acceleration |
Sharpen Your Skills for AP® Physics 1
Are you preparing for the AP® Physics 1 test? We’ve got you covered! Try our review articles designed to help you confidently tackle real-world physics problems. You’ll find everything you need to succeed, from quick tips to detailed strategies. Start exploring now!
Need help preparing for your AP® Physics 1 exam?
Albert has hundreds of AP® Physics 1 practice questions, free response, and full-length practice tests to try out.